Metroidhat's sewing techniques and materials guide for beginners
A general guide on fabrics
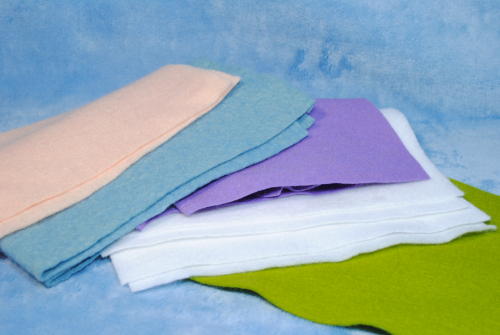
Here's a brief description of the three most popular fabrics for plushie making: fleece, minky, and felt. All of them are widely available at your local craft/fabric store and come in a large range of colors at reasonable prices. Although I encourage you to experiment with whatever you want!

Fleece
Fleece is ideal for the beginning plushier, with a good balance of cuddliness and ease of use. There's a few varieties of fleeces. I tend to go for arctic fleece, polar fleece, or anti-pill fleece while avoiding micro fleece, which has hardly any fuzz.
Pros:
-Fuzzy texture and slight stretch helps hide sewing mistakes and gives your plushie a nice squish.
-Its edges do not fray very easily, so it can be acceptable to leave raw edges showing on the outside. This makes it good for applique and doll hair.
-Fleece was made for warmth. It's very good for scarves, hats, and blankets.
Cons:
-It has a tendency to 'pill', that is, balls of fuzz form on its surface over the years if it is handled a lot.
-It has a two-way stretch, which can cause complications in your plushie. You may find areas twisting or becoming fatter than you intend if you're not paying attention while cutting or sewing.
Minky
That shimmery fur, that gentle squish, those vibrant colors! This is my favorite fabric to work with! You can sometimes get fabric with a very short pile (length of fur) or a medium length pile. Minky is also sometimes called micro-chenille, especially in Canada.
Pros:
-Mildly stretchy and fluffy, plushies made of minky are a delight to the senses!
-As a lighter fabric than felt or fleece, sewn corners appear sharper when they're bagged out.
-Although minky fur can be caught within a seam, the fur can be teased out using a needle or a cat brush, which helps hide the seam.
Cons:
-Because minky has a 'nap', you have to pay attention to how the pattern is cut, or else the direction of the fur will be going all over the place.
-It has a two-way stretch, so often pattern pieces can only be cut one way. There will also be more fabric wastage.
-The raw edges of minky can shed and unravel, so all edges need to be encased inside a plushie.
-Minky can be slippery to sew on a sewing machine, resulting in puckered seams, raw edges that don't match, and areas that shrink and stretch undesirably. If this is happening, sew slowly and use a lot of pins to hold the fabric in position.
-Being so fuzzy, cut minky will shed a lot. Keep a lint brush nearby and use an air purifier if you have one. Shake out cut pieces over a table and brush or vacuum the extra fluff away.
Felt
While I personally don't use felt a lot, beginning sewers find it easy to handle. Most felt is made with a percentage of plastic, but the good stuff is pure wool.
Pros:
-Felt often comes in small squares so there isn't much investment in materials.
-There is no good or bad side to the fabric, or stretch or grain. So you don't have to pay too much attention to how you're cutting your fabric.
-Its edges do not fray very easily so it can be acceptable to leave raw edges showing on the outside. This makes it good for applique and doll hair.
-With a smoother texture than fleece or minky, small details that are drawn, embroidered, painted, or glued on will show up better.
Cons:
-Felt is relatively stiff and unstretchy. The material wants to remain flat, so seams tend to curl inwards when stuffed. Because of this, felt may not be good for small plushies or ones that require a lot of curved, complicated seams. Felt plushies tend to be flatter and more angular, since they don't stretch into roundness.
-Felt does not have much integrity near its edges so it can not be cut too thinly or sewn too close to its edges if the seam is going to undergo a lot of stress.
Tools and Terminology
Tools
Optional stuff
Terminology
Hand-sewing Techniques
Stringing your needle
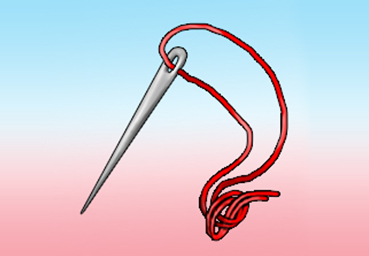
Cut about an arm's length of string and thread it through the eye of the needle. This is easiest to do if the end of the thread isn't frayed, and made even easier if you moisten the end first. Match up the two ends of the thread and tie them in a knot with about 1 cm of tail or more remaining. Tie another knot on top of the first knot to make it thicker. You'll need the knot to be thick enough so it doesn't pass right through the cloth.
Running Stitch, Double Running Stitch
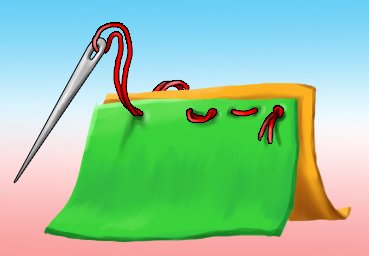
The running stitch, or basic stitch, or straight stitch, is used when two pieces of cloth are placed together. Simply poke the needle through both pieces of cloth and slowly pull the string taut. Don't pull too tightly though; you don't want an 'accordion' effect on your cloth. Then, on the side which the needle emerged from, poke the needle through again. Rinse and repeat. Usually, you stitch following the edge of the cloth, keeping about half a centimeter of space between the seam and the edge. The smaller you make each stitch, the better the end results will be. It will also help to poke the needle halfway through the cloth pieces, and turn it around to look at where the needle is before you pull the thread through. That will help keep your stitches even.The double running stitch is when you finish your single running stitch, you go back over it again. Like, a single running stitch forms a kind of dotted line. Going over it again fills in the dots and results in a continuous line.
Whipstitch, Overcast stitch
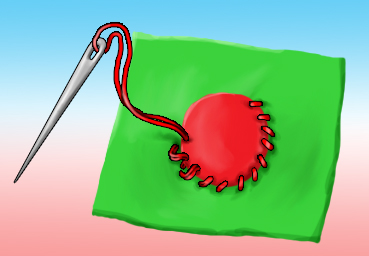
The Whipstitch is used to applique pieces of fabric directly on top of other pieces. First make sure the top piece of fabric is positioned correctly and pin it in place. Pass the needle through the bad side of the base fabric so that the knot is not visible on the good side. Also pass the needle through the edge of the top piece of cloth. Then pass the needle through your first cloth piece, but not the second one. Repeat. It's important to keep the stitches small and neat because they will be showing on the outside of the finished plush.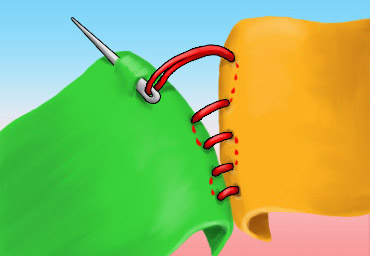
Ladder stitch, Slipstitch
If done properly, this stitch it hides the thread within the cloth. It achieves almost the same effect as the basic stitch but instead of sewing on the inside of the plushie, you are sewing on the outside. It's perfect for sewing up openings that are used for stuffing. It is used when there are two pieces of cloth that are folded inwards, with their folds needing to be connected. First, poke your threaded and knotted needle through the bad side of one cloth, ensuring that the knot is on the inside of the plushie. Next, pass the needle partway through the good side of the other piece of cloth at the closest location where the pieces meet. Don't pull the thread too tightly; you'll need space to perform the next step. Now that the tip of your needle is on the inside of the plushie, pass it through to the outside and pull the whole needle out. Repeat. Remember to pull the earlier stitches tight at some point, once you don't need the wiggle room.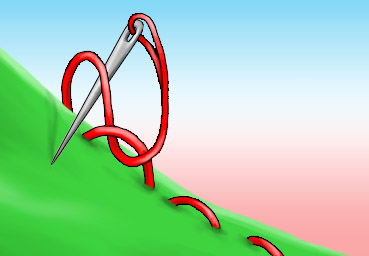
Tying off
When you finish sewing a section or run out of thread, you'll want to end the string in a knot. To do that, first find one of your previous stitches. If possible, try to choose one that is on the 'inside' of the final product so that the knot doesn't show on the outside. Now pass the needle through the stitch, but don't pull on it tightly. Pass your needle through the loop you just made, thus making a second loop. Now pull the strands of the second loop carefully, such that it shrinks the first loop, until that loop is all but gone. Pass the needle through the remaining loop and do the same thing to shrink it. Finally, you can just pull on the thread to shrink the final loop, resulting in a tight knot. Now snip off the remaining thread, leaving about 1 cm of tail. If your knot is on the 'outside' of the plushie, then you can hide the tail of the thread by poking your needle through the cloth near your knot and then taking it out at a farther location. Then snip the tail close to the cloth so that none of it is showing on the outside.Tips and tricks

Cutting fabric
Pattern pieces often indicate the direction of the nap or grain that they should be cut at. Nap means the direction of the fabric's fur, which usually flows one way. But even if your fabric has no fur, you will still need to pay attention to how you're cutting. Because many fabrics have a two-way stretch perpendicular to the grain and is stiff in the direction of the grain. If the stretch direction is incorrect, you will find your finished plushie too fat or too tall or it might end up twisted. So don't go cutting pattern pieces randomly!
If your pattern calls for 2 pieces, one of which is inversed, you can fold your fabric in half along the grain, right sides facing, and cut two pieces at once. So long as you're careful and the fabric is not too thick.
You can draw the outline of the pattern piece directly onto the back of your fabric or you can pin the paper pattern onto the fabric and cut around it.
Sewing curves
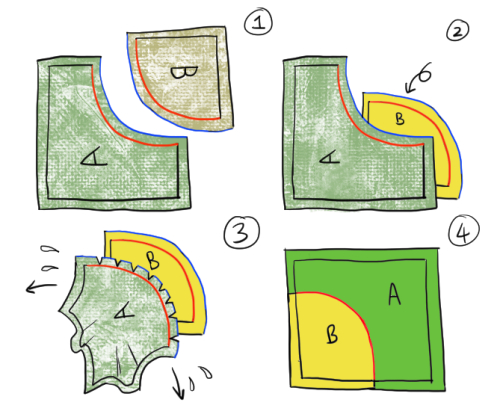
1. Imagine you're sewing a curve into a curve, kind of like piece A to piece B. (The letters A and B are flipped funny in this picture because you're looking at the fabric's backside) The inner lines represent the seam, and the outer lines represent the edge of the fabric. The red seam line on both pieces of fabric are equal in length and should fit together perfectly. But the outer blue line on piece A is shorter than on piece B due to their alternating curves.
2. Even worse, when you flip B around so the right sides of the fabric are facing, the two curves run concave and convex in opposition to each other! How are you going to sew them together???
3. You will need to clip into the seam allowance of the concave piece of fabric, which is A in this case. The more severe the concave curve or convex curve you're sewing into, the more clips you will want to make, and deeper, although you'll never want to cut beyond the seam allowance. Then spread A, forcing the curve to invert and the raw edge to be flush with the raw edge of B. Now you can sew it down.
4. This is what the two fabrics will look like on their right sides.
